How to Craft the Ultimate Hobby Space With Garage Cabinets
If you’re anything like me, your hobby is your therapy. Whether I’m working with wood or conquering home repair projects, that space needs to feel inviting and mine. For the longest time, though, I was working in clutter. With tools in random buckets and supplies buried in drawers, there was nowhere solid to focus in my garage—I knew I needed a better system of organization. Everything changed when I added custom garage cabinets.
Here are some tips on how to build your ideal setup with garage cabinets:
- Assess your hobby and storage needs
- Plan your garage layout for function and flow
- Choose the right garage cabinets for your hobby
- Organize tools and materials by category
- Maximize cabinet space with smart accessories
- Personalize your hobby space
- Maintenance tips to keep it organized
A proper hobby space means having everything you need in one place, where you can actually find it. Here’s how to achieve that with custom garage cabinets.
Assess Your Hobby and Storage Needs
Before I could organize anything, I had to get honest about what I actually do in my garage. Not just what I want to do, but the stuff I keep coming back to. For me, it’s woodworking, weekend repairs, a bit of tinkering with paint, and the occasional upcycled furniture project. That tells me a lot.
- Knowing Your Hobby Type Shapes Your Setup: If you’re into crafting or sewing, your needs are wildly different from someone like me who’s covered in sawdust half the time. One of my friends uses her garage for gardening, and she stores everything from soil to seed trays. The kind of projects you love? That’s your design blueprint.
- Inventory Gives You a Reality Check: I took a full afternoon to pull out every tool, every loose screw, every half-used can of wood stain. It was a lot of stuff, but it was necessary. Seeing what I owned (and how much of it I’d forgotten about) helped me plan smarter storage. No more buying duplicates just because I couldn’t find the original.
- Workspace vs. Storage Is a Balancing Act: I realized I needed a good chunk of floor space to move around and assemble things. That meant building cabinets up rather than out. For you, it might be different. The trick is knowing how much room you need to work comfortably—and how much can go behind doors when you’re done.
Plan Your Garage Layout for Function and Flow
The first time I set up a workspace, I made the mistake of putting storage wherever there was room. I had a cabinet by the door, a rolling shelf in the back, and random bins along the wall. Nothing flowed. Now, everything has a zone—and I move with my space, not against it.
- Zones Create a Sense of Order: My garage now has three main areas: a central workbench, a “storage wall” full of garage cabinets, and a clear floor zone where I can move freely (or park my bike). This layout makes me faster and less frustrated.
- Safety and Lighting Aren't Optional: I learned the hard way not to store heavy things up high or block light sources with tall cabinets. I also added task lighting over my bench and made sure cords weren’t where I’d trip on them. Little changes make a big difference.
- Room for Growth Keeps the Space Useful: New hobbies sneak in. I made sure I had a few empty drawers and some adjustable shelves to handle future gear. If your setup is too locked in, it’ll feel cramped in six months.

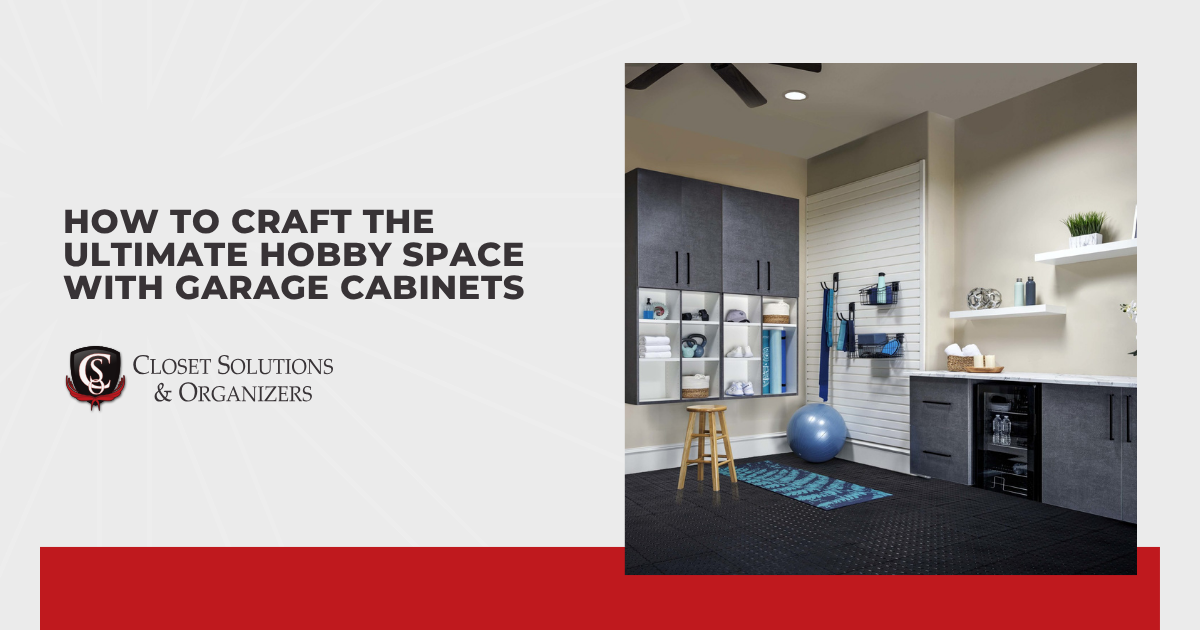
Choose the Right Garage Cabinets for Your Hobby
Not all garage cabinets are created equal. I used to think a few plastic bins counted as storage. They don’t. I learned to invest in the right combination of sizes and types, and suddenly, organizing felt intuitive.
- The Cabinet Type Really Matters: I use tall cabinets for large equipment and supplies I don’t use every week. Base units hold heavy tools, and wall-mounted cabinets keep daily-use items right where I can grab them. Mixing all three gave me the flexibility I needed.
- Materials Are a Long-Term Decision: I went with powder-coated steel because it holds up to dings, spills, and humidity. Laminate is great for lighter use or if you want a softer look. The key is choosing something that matches the wear and tear of your projects.
- Features Mean Functionality: My favorites? Soft-close doors so nothing slams when I’m in the zone. Lockable cabinets for the stuff I don’t want the kids near. Adjustable shelves that let me reconfigure when I change projects. Pegboard inserts turned one wall into a mini tool gallery.
Organize Tools and Materials by Category
Once the cabinets were installed, it was time for the real fun: filling them. I didn’t just toss things in. I treated it like solving a puzzle. The right spot for everything, and everything easy to grab.
- Categories Help My Brain Stay Calm: Paints and stains go together. All screws, bolts, and nails get one drawer. Sandpaper lives with the sander. Grouping by function makes cleanup easier and finding things effortless.
- Labels Save You Time: I use clear bins with labels for small parts, drawer dividers for screwdrivers and pliers, and containers inside cabinets to group related items. No more guessing games when I’m mid-project.
- Location Makes a Difference: The stuff I touch all the time, like my drill or clamps, lives front and center. Rarely used tools are up high or tucked in the back. I’ve found that if I have to dig for something, I’ll procrastinate using it.
Maximize Cabinet Space With Smart Accessories
Garage cabinets are the foundation, but the accessories are what make the system work. Without them, things slide around, get lost, or turn into new messes. With a few simple investments, and a little bit of strategy, you can optimize every square inch of your custom garage cabinets. Here’s how:
- Invest in Built-in Organizers: I added pull-out trays for small toolboxes, magnetic strips inside cabinet doors for wrenches, and even a few hanging hooks for cords and goggles. Now I can reach for what I need without digging.
- Add Protective Features: Foam inserts in drawers stop things from banging around. Liners keep my shelves clean. From experience, I can tell you: if you care about your gear, these tiny upgrades make a huge difference.
- Try Vertical Stacking: Inside one of my tall cabinets, I use tiered shelving and stackable bins to double the space. I didn’t think I had room for more until I made room.
Personalize Your Hobby Space
Once the foundation was set, I added a little personality. After all, this is where I go to zone out, problem-solve, and make things. It should feel good to be in your space, and here’s how to get there:
- Prioritize Comfort: I bought myself a decent stool. Installed a mini speaker. Tacked up a pinboard with project ideas, sketches, and photos that make me happy. Suddenly, it wasn’t just a garage—it was a creative space.
- Don’t Forget Style: I picked cabinet colors that matched the rest of the garage. Neutral but clean. Some folks go bold with red or blue. Either way, don’t underestimate how a cohesive look can make you want to be in the space.
- Invest in Proper Lighting: I added under-cabinet LEDs so I could see inside drawers at night. A small spotlight over my workbench helps when I’m working with detail. Function meets form.
Maintenance Tips to Keep It Organized
Once your dream hobby space is built, the challenge is keeping it that way. I’ve learned a few tricks to make staying organized feel natural, not like another chore.
- Use the Two-Minute Rule: Before I leave the garage, I do a two-minute sweep. Wipe surfaces. Return tools. Toss scraps. It’s quick, and it keeps the chaos from creeping back in.
- Do a Seasonal Reset: Every few months, I go through my cabinets and pull out anything I haven’t used. If something’s broken or expired, it’s gone. The more space I free up, the more I use what I love.
- Make Small Fixes Along the Way: I check hinges, clean drawer tracks, and wipe down doors every few weeks. A little upkeep keeps the whole system running like it should and keeps me focused on my projects, not problems.
Conclusion
I’ve found that crafting the ultimate hobby space doesn’t happen overnight, but adding garage cabinets was hands-down the best decision I’ve made for my DIY life. With the right setup, I spend less time digging and more time doing. Whether you’re into fixing, building, painting, planting, or just plain tinkering, a well-organized garage will become your creative launchpad. Make it yours, make it useful, and most importantly, make it fun!
QUICK LINKS
CONTACT INFO
Closet Solutions & Organizers
4332 - 81 Ave Edmonton, AB T6B 2M2, Canada
Phone
SCHEDULE A CONSULTATION
Contact us, and we will come out and discuss your project free of charge.